Setting up and connecting the external filter - here's how it works:

How do you set up and connect an external filter? What does an external filter look like from the inside?

We would like to answer these questions with a short video and show you how anyone can set up an internal filter within a few minutes. The following video will illustrate the inner design and which materials and accessories you will find there, using the example of the JBL CRISTALPROFI e1502 greenline . The larger and smaller models are only distinguished by their size and number of filter baskets, as well as some smaller visual differences. The interiors of all basically have the same design and the same installation method is followed.

The necessary steps

If you need detailed instructions to start the filter you can follow these steps.

The aquarium external filter is a pressureless system, which means that the filter is not self-priming. If you press the start button and the water doesn’t start to flow, it is usually due to mechanical blockages in the water flow or to differently filled levels, which prevent the necessary vacuum from building up. A reduced water level makes it harder for the filter to work.

For a correct start please follow these instructions carefully:

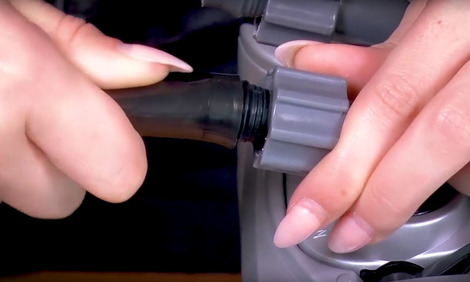
  1. Ensure that the filter is positioned below the aquarium. Between the filter head and the water surface there should be a height difference of at least 20 cm. Completely remove the water from the filter canister and the connection hoses. After this step the filter should be “dry”.
  2. Make sure that both small stopcock levers on the pump head are in the “OPEN” position. During the following start up procedure, the water outlet pipe with the spray bar etc. must be positioned ABOVE the surface of the water for an optimal ventilation of the appliance. Now press the “START” button on the pump head repeatedly (10 – 20 times) with the palm of your hand until water begins to flow into the suction hose (hose on “IN”).
  3. Wait until the filter has completely filled with water and the water in the hose leading to the water outlet pipe (hose on “OUT”) is at the same level as the surface of the water in the aquarium.
  4. Connect the filter to the mains power supply. The water will now flow out of the water outlet pipe into the aquarium. At first, it may be mixed with air that is still trapped between the layers of the filter media. Gently shake the filter to dislodge the air which will escape with the stream of water.
© 06.02.2018
Matthias Wiesensee
Matthias Wiesensee
M.Sc. Wirtschaftsinformatik

Social Media, Online Marketing, Homepage, Kundenservice, Problemlöser, Fotografie, Blogger, Tauchen, Inlineskating, Aquaristik, Gartenteich, Reisen, Technik, Elektronische Musik

Обо мне: Seit Teenagerzeiten mit Aquarien in Kontakt. Klassische Fischaquarien, reine Pflanzenaquarien bis hin zum Aquascape. Aber auch ein Gartenteich und Riffaquarien begleiten mich privat im Hobby. Als Wirtschaftsinformatiker, M.Sc. bin ich als Online Marketing Manager bei JBL für die Bereiche Social Media, Webentwicklung und der Kommunikation mit dem Anwender der JBL Produkte zuständig und kenne die JBL Produkte im Detail.

Комментарии

Information and consent to cookies & third-party content

We use technically necessary cookies/tools to offer, operate and secure this service. Furthermore ,with your express consent , we use cookies/tools for marketing, tracking, creating personalised content on third-party sites and for displaying third-party content on our website. You can revoke your consent at any time with effect for the future via the menu item ‘Cookie settings’.
By clicking on ‘Allow all’, you give us your express consent to the use of cookies/tools to improve the quality and performance of our service, for functional and personalised performance optimisation, to measure the effectiveness of our ads or campaigns, for personalised content for marketing purposes, including outside our website. This enables us to provide personalised online ads and extended analysis options about your user behaviour. This also includes accessing and storing data on your device. You can revoke your consent at any time with effect for the future via the menu item ‘Cookie settings’.
You can use the ‘Change settings’ button to grant and revoke individual consent to the cookies/tools and receive further information on the cookies/tools we use, their purposes and duration.
By clicking on ‘Only absolutely necessary’, only technically necessary cookies/tools are used.

В нашей "Политике конфиденциальности" вы узнаете, как мы обрабатываем личные данные и для каких целей мы используем обработанные данные.

Выберите настройки кукис

PUSH-уведомления от JBL

Будучи частью стандарта W3C, браузерные уведомления определяют API для уведомлений конечных пользователей, рассылаемых через уведомления браузера на десктопные и (или) мобильные устройства пользователей. На конечных устройствах уведомления появляются в виде, знакомом конечному пользователю по приложениям, установленным на устройстве (напр., электронная почта). На конечных устройствах уведомления появляются в виде, знакомом конечному пользователю по приложениям, установленным на устройстве (напр., электронная почта).

Эти уведомления позволяют оператору веб-сайта оставаться в контакте со своими пользователями в течение всего времени, пока у пользователей открыт браузер, — независимо от того, находится ли пользователь в конкретное время на веб-сайте или нет.

Для отправки браузерных пуш-уведомлений нужна лишь веб-страница с установленным специальным кодом (web-push-код). Таким образом марки без приложений также могут пользоваться многими преимуществами пуш-уведомлений (персонализованная коммуникация в режиме реального времени в нужный момент).

Браузерные уведомления являются частью стандарта W3C и определяют API для уведомления конечных пользователей. Уведомление позволяет информировать пользователя вне контекста веб-страницы о каком-либо событии, например, о новой записи в блоге.

JBL ГмбХ & Ко. KГ предоставляет этот сервис с простым подключением и отключением бесплатно.